Category Archives: Cake Pops

Cake pops & Life with Kids

Standard

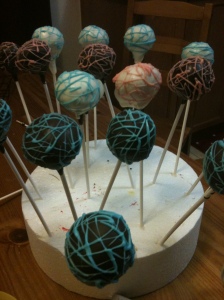
I think I’ve gotten the hang of making cake balls & cake pops – ok, not enough to make cute little critters staring up at anyone or anything like that (oh Bakerella how I adore and envy you!), but simple cake balls on a stick.  And as far as artistry – I am of the queen of swirling chocolate coloured contrast.

So much so that I once again donated a box of cake pops to some lucky individual with an incredible sweet tooth!

This time to the incredible moms at  Life with Kids who wonderfully set up a booth at the recent Baby Steps Fair in Oakville.

As a mom of two of the cutest little kids ever (LoL – of course I’m biased), Life with Kids is a great site to check out family events in the Mississauga, Oakville, Milton and Burlington area and geared towards everyone in an online community – from babies to teens and of course mommys!  Super information for local stuff.

Please check them out.

Cake Pops – Take 2

Standard

Hello again….  Remember me?

Apparently the last time I posted in my blog was mid April and now it’s mid June…. I can’t believe it’s been that long.  But don’t take my absence from the online blogging world to mean that I was just sitting around twiddling my thumbs.  Well, okay … I did that too, but I’ve also been busy baking up a storm….

This weekend was actually the last order from a string of cakes that has not stopped since the beginning of the month.  Yeah for keeping busy among sweets!  The cakes I’ve worked on I’ll post soon enough, but for now let me share with you my second try at CAKE POPS!  (I don’t know why, but it seems like there has to be an emphasis on the word “CAKE POPS” with an exclamation point – but it’s not like I’m going around screaming this at anyone)

Remember my last attempt at this cute treat?  Think back – my March 14 blog.  Think the yellow blobs of candy coating, surrounding the too moist balls of cake that slide off the sticks and made more of a mess than the few pictures I posted that actually survived to tell the tale?  Yeah, those…..  Well for some reason I actually forgot all this when my daughter’s dance teacher asked for baking volunteers to lend their services to the studios bake sale during their season end recital.  She asked if instead of cupcakes, if I could come up with a basket that would be used for the raffle.  You see where this is going, right???

So I baked two cakes: vanilla and chocolate.

And crumbled them down to crumbs.

This time around, I only added about half a container of icing to the crumbs and worked it in to the batches completely.  The texture was still moist but much more easier to compact into firm little 2″ balls.  They firmed up more in the fridge over night.

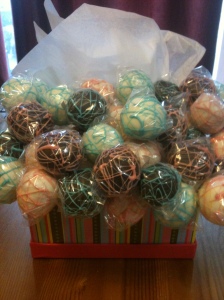
Melting down dark chocolate in one bowl and pink chocolate in another bowl via the microwave, I was ready to go to work with small groups of five balls of cake.  This is the key – work in small batches, leaving the rest in the fridge until ready so that they don’t warm up and loose that firm shape needed when you slip the lollipop stick into place.

Chocolate cake balls were surrounded by pink coating and vanilla cake balls were surrounded by the dark chocolate.  For extra measure, I switched colours for contrast as a topping.

And Voila!

As part of the presentation I wanted to display these in a decorated box, with cake spilling out of it.  I then took the time to wrap each individual cake pop using clear lollipop wrappers (look in Michael’s or any bake store).  Yes, I wrapped each one.  Every. Single. One.

If you actually counted out each one by the pictures above, that would be 40 cake pops.  40 individually wrapped cake pops.  Yes, a little labour intensive, but really well worth the effort when you look at the finish result.

And when I lingered around the raffle tables watching people slip pieces of paper into the decorated boxes next to their coveted prize, I could hear the soft murmur of “oohs” and “awes” at my basket.  I have to admit it was flattering to watch people dropping off tickets for my cake pops.  And when I glanced into the top of the raffle box – while trying to seem nonchalant about it – I grinned at how many pieces of paper were already inside.  I stayed around long enough (lingering in the background of everyone else) to see the excited look of the winner of my efforts proudly claim her prize as her family looked hungrily on.

It’s moments like that,that make all of this so worth while…..
Have Your Cake on a Stick

Standard

I’ve mentioned in the past that I love Love LOVE Bakerella‘s blog.  So many creations, so many delicious desserts….so very little time!  So really it was only a matter of time before I tried my hand at Cake Pops.  I even bought her book for myself just after Christmas (I think I had the intention of making it back then for one of the various Christmas parties I was going to, but….well… you know….procrastionation…..)

In short, cake pops are cake balls on a stick.  I’m serious!  What a fantastic idea, huh?!   Her book is filled with cute images of tiny cupcakes, animals, objects – you name it.  I have a character in mind (actually several) to eventually create, but for the mean time this is just my “practice” creations.  I want to see if I can actually do this….

To begin with, I baked a French vanilla cake from a box mix.  After allowing this to cool completely, I crumbled down the cake finely into tiny crumbs.  Use your hands and then use a fork to break down the bigger bits.  Add in 1/3 cup of frosting (your choice – I chose vanilla) and incorporate until the frosting is completely absorbed into the cake. 

Now pinch off about 2″ of cake and roll into little balls, set aside on a cookie sheet. 

 Once this is all done put all the cake balls in the fridge for several hours (I kept it over night) or the book suggests you can put it in the freezer for 15 minutes.  You want the balls to be firm, but not frozen.

Now onto the fun part.  The candy coating.  Okay, this is what I originally thought was the fun part…. let me explain.  It is fun when you do this part properly.  It is absolutely horrific when you get it wrong and the smell of burnt vanilla wafers emits itself from the depth of the microwave.  Wrong when you over eagerly hit the 1 minute button, instead of carefully watching the process melt down SLOWLY!  Slowly, meaning hitting the 30 second button and examining the wafers so that it comes out a glossy liquid – instead of what I originally did….hard, burnt and completely unusable.  SIGH!!!!

So I scrapped that and started all over again.  Thank you for the foresight, at least, to buy a second bag of Merckens wafers.

Dip the end of a candy stick partially into the melted candy coating – this helps the cake ball stick on to the stick.  Then gently insert stick half way into cake ball.  At this point, dip into the candy coating.  Careful to do this in one coating all over, as too much can pull the ball of the stick … I did this a few time over (and why it’s good to make lots of extras!).  Stick completed coated cake pops into a styrofoam to dry.  (Pre-press holes into the styrofoam before hand – it’s a small step, but it’s helpful)

Because this is my first attempt at making cake pops, I wasn’t all too prepared to create my characters.  So I just made up happy people.  Fondant eyes that I dotted with black edible ink and painted on smiles.  Done!!

I know I need to practice some more (especially since I promised to make these in June for my daughter’s dance recital bake sale), and there are some characters I’d love to challenge myself in to making in the near future once I assemble all the supplies in creating them – keep posted.

And although this is a lengthy process, this is definitely a fun and tasty way to have your cake.  Enjoy.

L