Category Archives: Vanilla

July’s cakes

Standard

Oh my goodness – July has been busy… my little kitchen oven has been working as hard as the sun this summer month….

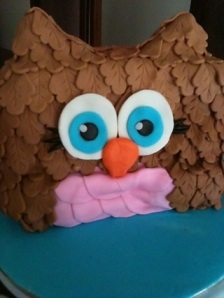
My neighbor called me on behalf of her friend for a birthday cake.  A birthday cake shaped like an owl for her 3-year-old daughter’s birthday (seriously, I love kids today!  My cake was still a slab or a round…ohhhhh).

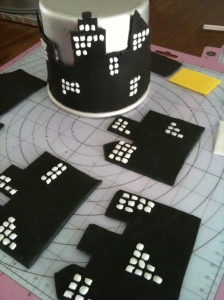
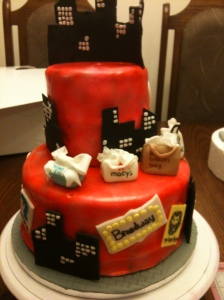
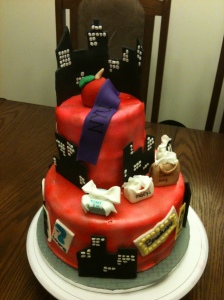
Then I had a New York city cake.  This was set on a girl leaving for New York University in the fall.  I wanted this to be girlie and fun.  Think “Sex & the City” – in cake form.

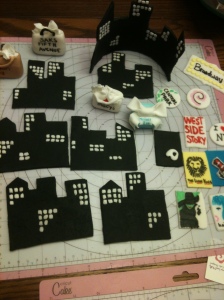
So what’s NYC without buildings?

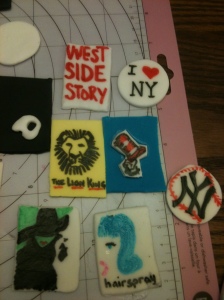
Or Broadway??  I took pieces of fondant and drew on iconic broadway posters – my favourite (to draw and watching the actual performance) was “Wicked”.

I even created fondant pieces of shopping bags and of course the Tiffany jewelry box.  What is NYC with some hardcore shopping?!

Put it all together and you’ve got my interpretation of a girlie view of NYC!

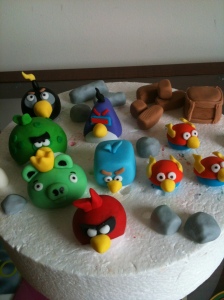
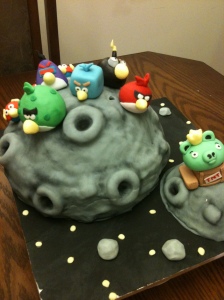
My next cake I did was an ANGRY BIRDS SPACE!  I have been looking forward to doing this cake since it was first requested!  Why, you ask?  Because I’m a geek and a fan of the entire angry birds series of games …  don’t believe me?  Look at my iPhone (then shake your head).  Hehehe.

Creating all the Angry Bird characters makes me happy.  Can’t you tell?

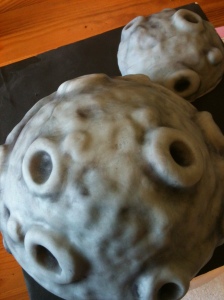
Then I created the moon.  I’m so proud of how it looked.

Throw on a bunch of angry birds and one scared green pig…and voila!

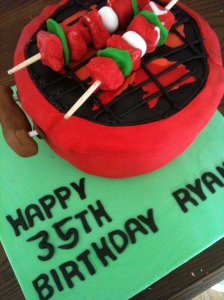
The last cake I created for July was a cake for my husband.  He celebrated his 35th birthday.  Coming up with an idea for his cake took a lot longer than my 5-year-old coming to a decision on her cake.  After much back and forth….originally he wanted a Guiness can cake, then a hamburger (he had that one last year), he finally decided on a BBQ cake.

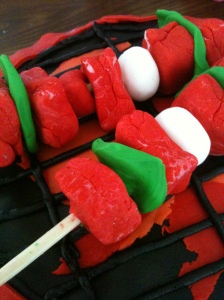
This included 2 “skewers” of fondant meat and green peppers and button mushrooms.  And yes I made sure to marble the meat – BBQ grill masters be proud!

So that’s a summary of my sweet July.

Bring on August…. more cakes to come

The Merry “Marry” Month of May

Standard

To say that I’ve been busy this month is an understatement!

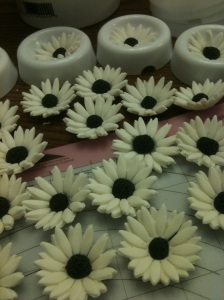
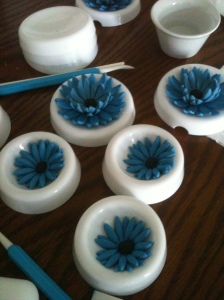
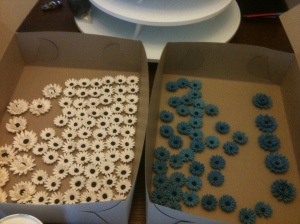
This month I have been busy making cakes and over 100 gum paste daisies. Yep – you read that right.  Over One Hundred gum paste Gerber daisies.  For those of you thinking, “What?!  That’s crazy!” … where were you earlier?!?

The daisies were for my best friend’s little sister’s very anticipated wedding.  Years, months, days and seconds went into planning the incredible event.  And in the whirlwind of wedding planning bliss, I was asked to make the wedding cake and cupcakes.  Yay!

So on May 1st, I started making little Gerber daisies….

And I didn’t stop until the Tuesday before the wedding (true story).

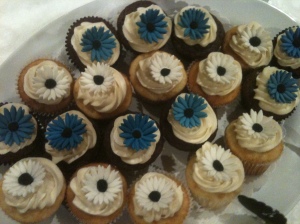
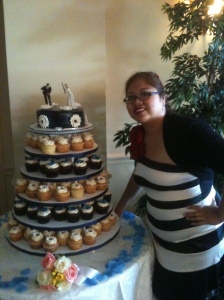
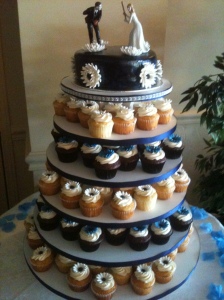
The lovely bride requested a simple wedding cake (vanilla cake with vanilla buttercream), covered in blue fondant and white Gerber daisies (of course).  And the cupcakes (approximately 132) were evenly divided between vanilla bean and chocolate, all topped with buttercream icing and a daisy.

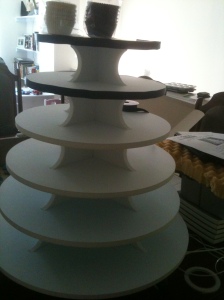
This was my first time displaying all my baking efforts for a wedding, so finding the perfect looking cupcake tower was a must.  I love the look of cupcake towers – my sister had one for her wedding 2 years ago and there are a variety all over the internet now a days.  I finally found it at Golda’s Kitchen – a simple round 6 tier tower that I can easily decorate with whatever ribbon accent along the edge.

Very pretty isn’t it?

It’s prettier completely filled too!

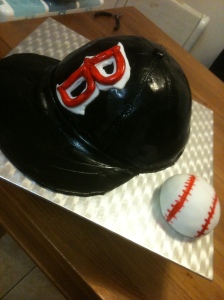
As an additional surprise the bride requested a grooms cake for the rehearsal dinner.  Because the groom is a HUGE Boston Red Sox fan, she asked for a simple baseball cap.  Love it!  The groom apparently couldn’t get enough of it during the dinner, pretending to wear it or place it on everyone elses head.  LOL.  I’m just glad it was a hit.


I have to admit that doing this wedding, delivering the cakes and cupcakes to the reception hall, and walking all the boxes straight into the large walk-in freezer of the kitchen made me feel like a real cake designer.  The feeling was continued into the next day when I arrived to set up the cupcake tower and set up “my vision”.

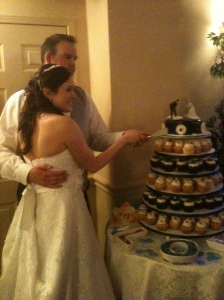
And the wave of pride seeing the happy couple next to their cakes just made my spirit soar.

Congratulations to Ashley and Christopher.

May all your days see sunshine and daisies.

Two Peas in a Pod

Standard

Babies are great!

I have 2 babies (okay they are quickly breaking free of the “baby” status as they run amok through my house), but really babies are great.  And TWO babies – well that’s got to be more fun, right?

A friend of mine is having twins.  For a small baby shower, I was asked to make her a cake with the theme “Two Peas in a Pod”, since everything would be green (not sharing the gender of the babies … plus it adds to a variety of clothes in various colours).

So naturally I made a pair of Peas nestled next to one another in a pod, smiling happily.

If only real vegetables were this happy.

To break the monotone of green I also added yellow flowers throughout the cake.  I figured that was as generic of a baby colour I could get after green.

The cake itself is a white cake with a Swiss meringue vanilla buttercream, my favorite filling.

I finished off the cake banner with a simple black gourmet edible marker.  Viola!

Enjoy

Cake Pops – Take 2

Standard

Hello again….  Remember me?

Apparently the last time I posted in my blog was mid April and now it’s mid June…. I can’t believe it’s been that long.  But don’t take my absence from the online blogging world to mean that I was just sitting around twiddling my thumbs.  Well, okay … I did that too, but I’ve also been busy baking up a storm….

This weekend was actually the last order from a string of cakes that has not stopped since the beginning of the month.  Yeah for keeping busy among sweets!  The cakes I’ve worked on I’ll post soon enough, but for now let me share with you my second try at CAKE POPS!  (I don’t know why, but it seems like there has to be an emphasis on the word “CAKE POPS” with an exclamation point – but it’s not like I’m going around screaming this at anyone)

Remember my last attempt at this cute treat?  Think back – my March 14 blog.  Think the yellow blobs of candy coating, surrounding the too moist balls of cake that slide off the sticks and made more of a mess than the few pictures I posted that actually survived to tell the tale?  Yeah, those…..  Well for some reason I actually forgot all this when my daughter’s dance teacher asked for baking volunteers to lend their services to the studios bake sale during their season end recital.  She asked if instead of cupcakes, if I could come up with a basket that would be used for the raffle.  You see where this is going, right???

So I baked two cakes: vanilla and chocolate.

And crumbled them down to crumbs.

This time around, I only added about half a container of icing to the crumbs and worked it in to the batches completely.  The texture was still moist but much more easier to compact into firm little 2″ balls.  They firmed up more in the fridge over night.

Melting down dark chocolate in one bowl and pink chocolate in another bowl via the microwave, I was ready to go to work with small groups of five balls of cake.  This is the key – work in small batches, leaving the rest in the fridge until ready so that they don’t warm up and loose that firm shape needed when you slip the lollipop stick into place.

Chocolate cake balls were surrounded by pink coating and vanilla cake balls were surrounded by the dark chocolate.  For extra measure, I switched colours for contrast as a topping.

And Voila!

As part of the presentation I wanted to display these in a decorated box, with cake spilling out of it.  I then took the time to wrap each individual cake pop using clear lollipop wrappers (look in Michael’s or any bake store).  Yes, I wrapped each one.  Every. Single. One.

If you actually counted out each one by the pictures above, that would be 40 cake pops.  40 individually wrapped cake pops.  Yes, a little labour intensive, but really well worth the effort when you look at the finish result.

And when I lingered around the raffle tables watching people slip pieces of paper into the decorated boxes next to their coveted prize, I could hear the soft murmur of “oohs” and “awes” at my basket.  I have to admit it was flattering to watch people dropping off tickets for my cake pops.  And when I glanced into the top of the raffle box – while trying to seem nonchalant about it – I grinned at how many pieces of paper were already inside.  I stayed around long enough (lingering in the background of everyone else) to see the excited look of the winner of my efforts proudly claim her prize as her family looked hungrily on.

It’s moments like that,that make all of this so worth while…..

Guinness Cupcakes

Standard

Happy St. Patrick’s Day.

Wear green.  Hug a leprechaun.  Kiss someone Irish.  Have a beer.

I have to confess something here…I hate beer.  Never liked the taste of it.  Don’t get me wrong, I’ll drink wine, cosmos, Smirnoff ice, long island ice teas, whiskey sours…sigh, the list goes on…but I just never got into beer.

Well, there is one beer that I will drink ….

GUINNESS

Half expected something on the lighter end of the spectrum?  Odd, I know. 

And in honor of St. Patty’s day I wanted to incorporate this cool, black liquid into a chocolate cupcake.  When I told my chocoholic Irish husband that this would be my next baking project, he literally jumped in the car to buy me several cans of the tasty beer.

I used up nearly an entire can of Guinness (the 1/4 of the liquid left over was promptly swallowed up by hubby).  Mixing in all the liquids together, you’re left with a light brown, fizzing concoction that smells faintly of beer and coffee (to me at least).  In a separate bowl, all the dry ingredients were added – including the unsweetened cocoa powder.  Adding dry to wet, I can still smell the prominent alcohol smell of the Guinness and wonder if this will be as strong as it smells once it bakes….

At least I know it will be “airy” – see the bubbles in the batter?

Once it finished baking (the recipe ended up making approx. 27 cupcakes), my kitchen was warmly overwhelmed with the subtle, sweet smell of chocolate.  No strong beer smell emitting itself from these warm brown cakes.  Phew

Allowing them to completely cool, I decided to top them off with the Swiss Meringue buttercream.  I debated if I should food colour them green.  ‘Tis the season….. My husband immediately nixed the idea, noting that a pint of Guinness has a white foamy head when poured.  Ahhhhhh!!!  Chocolate cupcake with a white, “foamy” topping.  See the connection??  

The cupcake itself tastes wonderful.  It isn’t overly chocolately and it’s delightfully light and airy.  The taste of Guinness is nicely subtle and balanced.  It works well with the swiss meringue buttercream also.  Will definitely have to bake this again for other non-green related holidays.  Hubby is ecstatic!

Everyone raise your cupcakes!  Cheers!!

L

Guinness Cupcakes (adapted from My baking addiction)

Ingredients

  • 3/4 can Guinness Stout
  • 1/2 cup milk
  • 1/2 cup vegetable oil
  • 1 tablespoon pure vanilla extract
  • 3 large eggs
  • 3/4 cup sour cream
  • 3/4 cup unsweetened cocoa
  • 2 cups sugar
  • 2 1/2 cups all-purpose flour
  • 1 1/2 teaspoon baking soda

Preheat the oven to 350F.

In a large mixing bowl, combine the Guinness, milk, vegetable oil and vanilla.  Beat in the eggs, one at a time.  Add and mix the sour cream.  In a separate large mixing bowl, whisk together the cocoa, sugar, flour and baking soda.  Gradually mix the dry ingredients into the wet Guinness mixture.  Divide the batter among lined cupcake tin.  Bake for 25 minutes, until cupcakes have risen and set in the middle but still soft and tender.   Allow to cool completely before frosting.

Makes approx. 24 – 28 cupcakes

Swiss Meringue Vanilla Buttercream (adapted from Smitten Kitchen)

  • 1 cup sugar
  • 4 large egg whites
  • 3 sticks butter, softened
  • 1 teaspoon vanilla extract

Whisk egg whites and sugar together in a metal bowl over a pot of simmering water.  Whisk occasionally until you can’t feel the sugar granules when you rub the mixture between your fingers.

Transfer the mixture into the mixer and whip until it turns white and about doubles in size.  Add the vanilla.  (Tip: when you transfer to the mixer, make sure you wipe the condensation off the bottom of the metal bowl, so that no water gets into the egg whites.  This can keep them from whipping up properly)

Finally add the butter a stick at a time and whip, whip, whip!  (Note: Do not start to panic when this takes a while to come together.  It will.  Patience!)

Have Your Cake on a Stick

Standard

I’ve mentioned in the past that I love Love LOVE Bakerella‘s blog.  So many creations, so many delicious desserts….so very little time!  So really it was only a matter of time before I tried my hand at Cake Pops.  I even bought her book for myself just after Christmas (I think I had the intention of making it back then for one of the various Christmas parties I was going to, but….well… you know….procrastionation…..)

In short, cake pops are cake balls on a stick.  I’m serious!  What a fantastic idea, huh?!   Her book is filled with cute images of tiny cupcakes, animals, objects – you name it.  I have a character in mind (actually several) to eventually create, but for the mean time this is just my “practice” creations.  I want to see if I can actually do this….

To begin with, I baked a French vanilla cake from a box mix.  After allowing this to cool completely, I crumbled down the cake finely into tiny crumbs.  Use your hands and then use a fork to break down the bigger bits.  Add in 1/3 cup of frosting (your choice – I chose vanilla) and incorporate until the frosting is completely absorbed into the cake. 

Now pinch off about 2″ of cake and roll into little balls, set aside on a cookie sheet. 

 Once this is all done put all the cake balls in the fridge for several hours (I kept it over night) or the book suggests you can put it in the freezer for 15 minutes.  You want the balls to be firm, but not frozen.

Now onto the fun part.  The candy coating.  Okay, this is what I originally thought was the fun part…. let me explain.  It is fun when you do this part properly.  It is absolutely horrific when you get it wrong and the smell of burnt vanilla wafers emits itself from the depth of the microwave.  Wrong when you over eagerly hit the 1 minute button, instead of carefully watching the process melt down SLOWLY!  Slowly, meaning hitting the 30 second button and examining the wafers so that it comes out a glossy liquid – instead of what I originally did….hard, burnt and completely unusable.  SIGH!!!!

So I scrapped that and started all over again.  Thank you for the foresight, at least, to buy a second bag of Merckens wafers.

Dip the end of a candy stick partially into the melted candy coating – this helps the cake ball stick on to the stick.  Then gently insert stick half way into cake ball.  At this point, dip into the candy coating.  Careful to do this in one coating all over, as too much can pull the ball of the stick … I did this a few time over (and why it’s good to make lots of extras!).  Stick completed coated cake pops into a styrofoam to dry.  (Pre-press holes into the styrofoam before hand – it’s a small step, but it’s helpful)

Because this is my first attempt at making cake pops, I wasn’t all too prepared to create my characters.  So I just made up happy people.  Fondant eyes that I dotted with black edible ink and painted on smiles.  Done!!

I know I need to practice some more (especially since I promised to make these in June for my daughter’s dance recital bake sale), and there are some characters I’d love to challenge myself in to making in the near future once I assemble all the supplies in creating them – keep posted.

And although this is a lengthy process, this is definitely a fun and tasty way to have your cake.  Enjoy.

L

Sweet & Simple

Standard

I pretty much wanted to tackle something that wasn’t chocolate this time around in baking.  So I went to chocolates opposite….

Vanilla.  Oh so sweet, oh so simple.

I actually wanted to play with a vanilla bean, rather than just the extract.  Oh my … what a wonderful little spice. 

I have to be honest, I’ve never used an actually vanilla bean before, but if the Food Network has taught me anything it’s rather simple to work with.  Simply split the pod open and scrape out the little seeds within that are essentially where all that vanilla flavour and goodness is hidden.

I wanted to use vanilla bean for that subtle, natural flavour and because I like the tiny black flecks that spot the cupcake and frosting.  Hehe.

Scanning the internet for its wide variety of choices on my desired cupcake, I came across My Kitchen Addiction.  I really think it was the pictures of vanilla bean cupcakes that were posted that initially drew me in.  They looked delicious!!  And the recipe looked simple enough.  Even the frosting was incredibly tempting.  Swiss meringue buttercream.  Divine decadence!  So I figured I’d give it a try….

I followed the recipe and although it calls for a teaspoon of vanilla paste (look in speciality shops), I just used 1 vanilla bean and 1/2 tsp of vanilla extract.  As my cupcakes baked, I went to work on the Swiss meringue buttercream.  Follow the recipe to a T, and as noted, do not give up on it.  It does become a gloupy mess, but continue to whip (I have to mention here, that I do not own a stand up mixer, but instead I have a handheld electric mixer which has served it’s purpose.  But for the length of the time whipping the meringue, I can see why the stand up mixer would be a great thing to use at this point!  On the plus, I have a wicked bicep – only on my right arm, but still….)

20 minutes later my kitchen (actually my entire house) is soon enveloped in the familiar sweet vanilla smells of a seasoned bakers kitchen.  
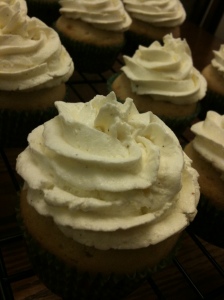
As much as I like the cupcake, I think the next time around I would like to find an airy angel food cake type of cupcake, as I found this poundcake-cupcake heavy.  Don’t get me wrong, it was still good, but with such a light frosting I’d like to have a “light” cupcake. 

Speaking of the frosting, I did Love, Love, LOVE the Swiss meringue buttercream and will definitely be adding that into my collection of favourite recipes.  Bliss….

Ingredients

(Yields approx 18 cupcakes)

  • 1/2 pound (2 sticks) unsalted butter, softened
  • 1/2 pound sugar (approximately one cup)
  • 4 large eggs
  • 1 teaspoon vanilla bean paste
  • 1/2 pound all-purpose flour (approximately 2 cups)
  • 1 teaspoon baking soda
  • 1/2 teaspoon salt
  • 1/4 cup milk
  • 1/4 cup sour cream
  • Swiss Meringue Buttercream (via Smitten Kitchen) – the 9-inch cake recipe will make the right amount of frosting for the cupcakes, with a little bit left over

Preheat the oven to 350°F. Line two muffin pans with paper cupcake cups and set aside.

In the bowl of a stand mixer, combine the butter and sugar.  Beat on medium speed until the mixture is creamed and looks light and fluffy.  Gradually add the eggs, one at a time, beating after each addition until each egg is incorporated.  Add the vanilla bean paste and beat to incorporate.

In a separate bowl, combine the flour, baking soda, and salt. In another small bowl, whisk together the milk and sour cream.  Gradually add the dry ingredients alternately with the wet ingredients, beating on a low-speed. Be sure to start and end with the dry ingredients.  Once the last of the dry ingredients have been added, beat on medium speed for about 30 seconds, until the batter is smooth.

Spoon the batter into the prepared cupcake cups, filling each cup approximately 2/3 full.  Bake for about 20 minutes, until the tops spring back when touched lightly with your finger.  Cool in the pans for a few minutes, then transfer to wire racks to cool completely.

Prepare the Swiss meringue buttercream according to the recipe over at Smitten Kitchen.  I subbed in 1 vanilla bean pod for the 1 teaspoon of vanilla extract.

Once the cupcakes have cooled completely, pipe swirls of the buttercream onto the top of each cupcake, and completely enjoy!

L